

Before you can begin utilizing your new Apple HomePod, you’ll have to set it up utilizing an iPhone or iPad that is adjusted to an iCloud account.
Amid the setup procedure, HomePod will interface the iCloud record to individual demand highlights got to through the speaker by means of Siri voice orders, for example, the capacity to send messages, set up updates, and get timetable notices.
It will likewise interface the HomePod to any current Apple Music membership attached to that iCloud/iTunes client, so it merits considering which account holder in your family you need to connect with the speaker.
For the HomePod setup procedure to work you’ll require an iOS gadget running iOS 11.2.5 or later, so check your iPhone or iPad is up and coming. To do as such, open the Settings application, tap General – > About, and search for the form number. On the off chance that you have to refresh, tap back to Settings, select Software Update, and take after the onscreen guidelines.
Enable iCloud Keychain and Two-Factor Authentication
To match HomePod with your picked iCloud account you’ll likewise need iCloud Keychain and Two-Factor Authentication empowered. You can improve the speaker’s setup procedure by ensuring these capacities are as of now actuated. See our different well ordered aides for utilizing iCloud Keychain and Two-Factor Authentication on your iPad and iPhone, and meet us back here when you’ve empowered both.
Once you’ve unpacked the HomePod, put it on a steady level surface that is about abdomen tallness and near an electrical plug. Try not to stress excessively over where you place it in the room, as HomePod will progressively modify its sound yield by dissecting the ecological acoustics. Presently connect to the speaker unit utilizing the provided control link and take after the directions beneath.
Initial HomePod Setup Using an iPhone or iPad
You’re currently prepared to start the record connecting setup technique for your new HomePod. The speaker utilizes Apple’s restrictive W1 chip to speak with other Apple gadgets, so on the off chance that you’ve at any point associated a couple of remote AirPods to an iPhone or iPad at that point you’re as of now in commonplace region. Here are every one of the means you have to take after to set up HomePod.
- Make sure your iPhone or iPad has Bluetooth turned on, and bring it close to the speaker.
- Tap Set Up on the pairing card that appears on your iOS device’s screen.
- If you have HomeKit enabled and use multiple homes, you’ll be asked which one you want HomePod to be associated with. Choose an option from the list and tap Continue.
- Select which room of your home the HomePod is in and tap Continue.
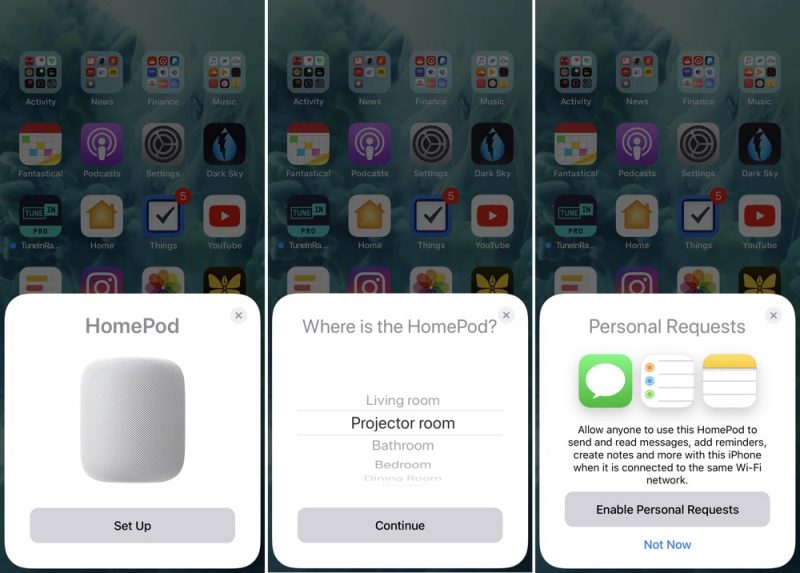
- Select Enable Personal Requests to let Siri access your messages, reminders, and notes whenever your iOS device is on the same Wi-Fi network, or tap Not now if you’d rather not grant this permission for privacy reasons. You can adjust this setting later.
- If you enabled Personal Requests in the last step, you’ll be asked if you want to “Use This Device” when sharing your location. You can either tap to agree, or tap Don’t Enable to turn off the Personal Requests function.
- Tap Continue on the “Siri on HomePod” card.
- Tap Agree to agree to Apple’s terms and conditions.
- Tap Transfer Settings to use your iCloud account, Wi-Fi, and other relevant settings on your iPhone or iPad to configure your HomePod. You can change them later in the Home app.

Now, any current Apple Music membership will consequently be synchronized to HomePod, while clients without a membership will be offered a free three-month trial.
Note that if the setup screen doesn’t show up consequently (stage 2 above), open the Home application on your iOS gadget, tap the in addition to (+) image in the upper right of the screen, and afterward tap Add Accessory. In conclusion, tap “Don’t Have a Code or Can’t Scan?” and select HomePod in the “Close-by Accessories” list.